A coded UI test provides a mechanism to automatically execute and drive the application in much the same manner as a human sitting in front of a computer. It operates at the user interface layer and can be programmed to validate elements of the UI at various points during the test to confirm that the application is behaving properly.
Coded UI tests can be authored in C# or Visual Basic, and Visual Studio 2012 provides tools to help auto-generate much of this required code.
We will start by creating a simple Coded UI Test using the
Coded UI Test Builder and adding some validation logic.
Setting Up the Sample Application
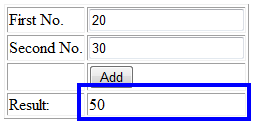
We will use a simple web application having one web form.
Create a test project
We will need a test project in which to house Coded UI test. Click File -> New -> Project, which will display the New Project dialog box. Select Visual C# -> Test -> Coded UI Test Project. Name the project “CodedUITestProject” and select “Add to solution” in the Solution drop-down. Click OK.
“Generate Code for Coded UI Test” will appear, providing options for generating test.
Choose the first option “Record actions, edit UI map or add assertions”. This option allows recording a Coded UI test from scratch by navigating through the application in the same manner that a user might.
The moment you choose above mentioned option
Coded UI Test Builder appears.
Assuming you have launched the web form (calculate.aspx) in browser. Click the record button of the Test Builder. You can now begin recording the Coded UI test by using the application in same manner you would expect a user to. Type 20 in first textbox, then type 30 in second textbox, and click the Add button.
You can visually inspect the actions that the Test Builder has captured by clicking on
Show recorded steps of the Test Builder.
At this point of time, validation logic can be added to confirm that the result of addition operation is correct. Before adding assertion, performed steps must be converted into source code. Do so by clicking on
Generate Code.
A dialog will appear prompting you to name the method you want to create within coded UI test. Type “EnterDataAndClickAdd”; then click
Add and Generate to resume building coded UI test.
You can now add assertion logic to validate the properties of one or more controls. The Test Builder allows you to easily select the control you want to validate. Do so by clicking the Add Assert and dragging the crosshair icon from the Test Builder on to the bottommost label next to Result of the form. As you hover over controls, you will notice that they become highlighted to indicate which control you are selecting. Once you have selected the bottommost label of the form, release your mouse button.
The properties for the lblResult label will be displayed.
For this test, we want to confirm that the number 50 (the sum of 20 and 30) is properly displayed in the textbox. In the list of properties for this control, you will see that the InnerText property has a value of 50. Highlight this row, then click Add an Assertion. “Add assertion” dialog will appear, allowing you to define the behavior of your assertion. Click the Comparator drop - down to examine your assertion choices. Accept the default value (AreEqual) for Comparator and the current value (50) for Comparison Value. You can also type message in case assertion fails .Click OK. The Test Builder will display a message indicating that your assertion has been added.
Click Generate Code from within the Test Builder to codify the assertion just added. A dialog will appear to name the method the will correspond to you assertion. Name the method “AddAssert” and click Add and Generate. The Test Builder now converts the assertion you defined into C# and insert this into test project.
Once you are finished, close the Test Builder, which will return you to Visual Studio.
Generated Code
In Solution Explorer, Open CodedUITest1.cs.
This is the main execution harness for the test, and calls all of the action and assertion methods you have defined earlier, as shown here:
[TestMethod]
public void CodedUITestMethod1()
{
      this.UIMap.EnterDataAndClickAdd();
      this.UIMap.AddAssert();
}
To better understand what each method is actually doing, you can examine the partial class file name UIMap.Desginer.cs. Right click on the EnterDataAndClickAdd method call and select “Go to definition”.
public void EnterDataAndClickAdd()
{
      #region Variable Declarations
      HtmlEdit uITxtFNoEdit = this.UIHttplocalhost52996CaWindow.UIHttplocalhost52996CaDocument.UITxtFNoEdit;
      HtmlEdit uITxtSNoEdit = this.UIHttplocalhost52996CaWindow.UIHttplocalhost52996CaDocument.UITxtSNoEdit;
      HtmlInputButton uIAddButton = this.UIHttplocalhost52996CaWindow.UIHttplocalhost52996CaDocument.UIAddButton;
      #endregion

      // Type '20' in 'txtFNo' text box
      uITxtFNoEdit.Text = this.EnterDataAndClickAddParams.UITxtFNoEditText;

      // Type '30' in 'txtSNo' text box
      uITxtSNoEdit.Text = this.EnterDataAndClickAddParams.UITxtSNoEditText;

      // Click 'Add' button
      Mouse.Click(uIAddButton, new Point(40, 13));
}
This method is responsible for various actions, as defined by the action recorded earlier. It will put values in two textboxes and then click on Add.
Running Test
Launch the form in browser. Open Test Explorer by clicking TEST menu -> Windows -> Test Explorer. You need to build the solution to load all the tests in Test Explorer. Right click on
CodedUITestMethod1 and select
Run Selected Test.
Avoid using your mouse or keyboard while the text executes. If you have recorded test properly, the values 20 and 30 will be inserted into the textboxes, and Add button will be clicked. When finished, the test results will be displayed as shown
Creating Data-Driven Coded UI Test
Coded UI Test can be data-driven. So that it can be run multiple times with different data sources. Instead of having to implement a number of different tests permutations, we can instead bind the test to a data source and access the current data row for the test.
The different data sources are: CSV, Excel, Test Case, XML and SQL Express.
We will use XML as data source to make the Coded UI Test we created earlier; data-driven. Add an XML file to
CodedUITestProject by the name “CalcData.xml” and put following xml in it.
xml version="1.0" encoding="utf-8" ?>
<DataContextData>
  <DataContextRow>
    <InputValue1>11</InputValue1>
    <InputValue2>22</InputValue2>
    <ExpectedAddAnswer>33</ExpectedAddAnswer>
  </DataContextRow>
  <DataContextRow>
    <InputValue1>12</InputValue1>
    <InputValue2>11</InputValue2>
    <ExpectedAddAnswer>23</ExpectedAddAnswer>
  </DataContextRow>
</DataContextData>
Now open the “CodedUITest1.cs” and add DataSource attribute to
CodedUITestMethod1 and modify the code as shown below.
[TestMethod]
[DataSource("Microsoft.VisualStudio.TestTools.DataSource.XML", "|DataDirectory|\\CalcData.xml", "DataContextRow", DataAccessMethod.Sequential)]
public void CodedUITestMethod1()
{
      this.UIMap.EnterDataAndClickAddParams.UITxtFNoEditText = TestContext.DataRow["InputValue1"].ToString();
      this.UIMap.EnterDataAndClickAddParams.UITxtSNoEditText = TestContext.DataRow["InputValue2"].ToString();
this.UIMap.EnterDataAndClickAdd();
      this.UIMap.AddAssertExpectedValues.UIItem50PaneInnerText = TestContext.DataRow["ExpectedAddAnswer"].ToString();
      this.UIMap.AddAssert();

}
We use TextContext.DataRow to fetch row from the datasource. So this method will run for each row in datasource; putting the values of columns in respective controls along the way.
Now, launch the form in browser and run the test from Test Explorer. If no assertion fails, it should pass for all datarows.
Note: If you encounter error “The unit test adapter failed to connect to the data source or to read the data” during test run; Right click on “CalcData.xml” in Solution Explorer and select
Properties and in Copy to
Output Directory, choose either
Copy always or
Copy if newer.
Make some changes to XML file to make the test fail.
xml version="1.0" encoding="utf-8" ?>
<DataContextData>
  <DataContextRow>
    <InputValue1>11</InputValue1>
    <InputValue2>22</InputValue2>
    <ExpectedAddAnswer>33</ExpectedAddAnswer>
  </DataContextRow>
  <DataContextRow>
    <InputValue1>12</InputValue1>
    <InputValue2>11</InputValue2>
    <ExpectedAddAnswer>33</ExpectedAddAnswer>
  </DataContextRow>
</DataContextData>
Notice we have changed expected value for second row to 33, which is wrong (12 + 11 = 23). Now run the test again.
You can notice the test passed for first row but failed for second row.
Apart from recorded asserts, you can also add assertion logic by writing custom code. Now we will add some code to check that FirstTextbox should not be blank. Open UIMap.cs and add following code.
public partial class UIMap
{
       public void AssertIfFNoIsBlank()
       {
            HtmlEdit uITxtFNoEdit = this.UIHttplocalhost52996CaWindow.UIHttplocalhost52996CaDocument.UITxtFNoEdit;
            Assert.AreNotEqual(string.Empty, uITxtFNoEdit.Text.Trim(), "First Number cannot be blank.");
       }
}
Now add a call to
AssertIfFNoIsBlank to
CodedUITest1.cs.
public void CodedUITestMethod1()
{
      this.UIMap.EnterDataAndClickAddParams.UITxtFNoEditText = TestContext.DataRow["InputValue1"].ToString();
      this.UIMap.EnterDataAndClickAddParams.UITxtSNoEditText = TestContext.DataRow["InputValue2"].ToString();
      this.UIMap.EnterDataAndClickAdd();
      this.UIMap.AssertIfFNoIsBlank();
      this.UIMap.AddAssertExpectedValues.UIItem50PaneInnerText = TestContext.DataRow["ExpectedAddAnswer"].ToString();
      this.UIMap.AddAssert();
}
Again modify the xml file so that first textbox remain blank; to make this test fail.
xml version="1.0" encoding="utf-8" ?>
<DataContextData>
  <DataContextRow>
    <InputValue1></InputValue1>
    <InputValue2>22</InputValue2>
    <ExpectedAddAnswer>33</ExpectedAddAnswer>
  </DataContextRow>
  <DataContextRow>
    <InputValue1>12</InputValue1>
    <InputValue2>11</InputValue2>
    <ExpectedAddAnswer>23</ExpectedAddAnswer>
  </DataContextRow>
</DataContextData>
Run the test again.
You can verify the test passed for second row but it failed for first row because we modified the xml for the first value to be blank. Similarly more custom assertion logic can be added to verify the UI elements.
You can now maintain the CalcData.xml file within test project to add new rows of data. Those rows can be used for future test runs.