Prerequisites:
When you install TFS Power Tools you get an additional menu option called Process Editor under Tools menu in Visual Studio 2010.

The Process Editor allows us to customize work item type workflow. For example, we can customize the Bug Work Item Workflow by clicking Work Item Types and selecting Open WIT from Server.

This brings up a dialog box with the available TFS Projects. So if we want to customize Bug Work Item we expand the desired TFS Project node and select Bug work item.

Selecting Bug Work Item Type opens the work item in Visual Studio tab. Click the Workflow tab to customize the associated workflow.

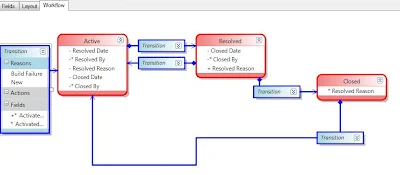
The original workflow for Bug Work Item Type takes bugs from Active to Resolved and finally Closed. Additionally bug can be sent back to Active state either from Resolved or Closed.
Now we want to add another state Awaiting Approval so that when a bug resolved it should go to Closed state only after approval. We do this by adding a new State object to the workflow from the toolbox.

Double click the new State and name it “Awaiting Approval”.

To connect the Workflow states, Click the Transition Link tool in toolbox and click the Resolved state and connect it to Awaiting Approval state. Repeat the same process for Awaiting Approval state to Active state.

When two state objects have been connected by a transition link we see a new blue transition object. We can click the downward-pointing double arrow to modify transition object.

Each transition must be given a reason which explains why the workflow progressed from one state to the next.
To set the reason why the workflow goes from Awaiting approval to Accepted we double-click the transition object connecting them. This brings up the Workflow Transition dialog.

We switch to the Reasons tab to set the reason(s) the change in state can occur. Simply click New to add a new reason.

In this case we say there are two reasons a Bug item can go into the Awaiting Approval state:

We’ll also add the second reason, when product manager’s acceptance is required.

Now we have two reasons for a Bug going into Awaiting Approval state.
Similarly, add reasons for a Bug going into Active state from Awaiting Approval.
To do so double click on the transition state that links Resolved to Closed. This opens up Workflow Transition dialog box. On Transition Detail tab select Awaiting Approval in from dropdown.

This will link Awaiting Approval state to Closed state.

You can add reason to this transition like Approved by Client or Approved by Product Manager.
Also read, related post
Customize a TFS Work Item to create new Work Item
- Team Foundation Server 2010
- Microsoft Visual Studio 2010
- TFS Power Tools
When you install TFS Power Tools you get an additional menu option called Process Editor under Tools menu in Visual Studio 2010.

The Process Editor allows us to customize work item type workflow. For example, we can customize the Bug Work Item Workflow by clicking Work Item Types and selecting Open WIT from Server.

This brings up a dialog box with the available TFS Projects. So if we want to customize Bug Work Item we expand the desired TFS Project node and select Bug work item.

Selecting Bug Work Item Type opens the work item in Visual Studio tab. Click the Workflow tab to customize the associated workflow.

The original workflow for Bug Work Item Type takes bugs from Active to Resolved and finally Closed. Additionally bug can be sent back to Active state either from Resolved or Closed.

Now we want to add another state Awaiting Approval so that when a bug resolved it should go to Closed state only after approval. We do this by adding a new State object to the workflow from the toolbox.

Double click the new State and name it “Awaiting Approval”.

To connect the Workflow states, Click the Transition Link tool in toolbox and click the Resolved state and connect it to Awaiting Approval state. Repeat the same process for Awaiting Approval state to Active state.

When two state objects have been connected by a transition link we see a new blue transition object. We can click the downward-pointing double arrow to modify transition object.

Each transition must be given a reason which explains why the workflow progressed from one state to the next.
To set the reason why the workflow goes from Awaiting approval to Accepted we double-click the transition object connecting them. This brings up the Workflow Transition dialog.

We switch to the Reasons tab to set the reason(s) the change in state can occur. Simply click New to add a new reason.

In this case we say there are two reasons a Bug item can go into the Awaiting Approval state:
- Waiting to be accepted by Client (this is default).
- Waiting to be accepted by Product Manager.

We’ll also add the second reason, when product manager’s acceptance is required.

Now we have two reasons for a Bug going into Awaiting Approval state.
Similarly, add reasons for a Bug going into Active state from Awaiting Approval.
- Rejected by Client.
- Rejected by Product Manager.
To do so double click on the transition state that links Resolved to Closed. This opens up Workflow Transition dialog box. On Transition Detail tab select Awaiting Approval in from dropdown.

This will link Awaiting Approval state to Closed state.

You can add reason to this transition like Approved by Client or Approved by Product Manager.
Also read, related post
Customize a TFS Work Item to create new Work Item


1 comment:
Write CommentsThis is just an excellent post, thanks very much.
ReplyDeleteI need to set up my work item templates and corresponding workflows so that certain fields are captured in the TFS database, specifically the closed by and closed date values. The closed date value is not in the workflow at all, and the close by field is set to equal CLOSED in the workflows.
Any pointers on how to modify the fields so that this information is captured in the workflow when an entry is closed, and to set the closed by value to be the user that actually closes the item?
Thanks.