In this article, you will learn about Conditional Split Transformation in SSIS with an example.
Conditional Split is used to divide the flow of data to more than one destination depending on the condition(s).
Example
We have a table in SQL Server Database which stores Credit Card Details and we will fetch the data and on the basis of Credit Card No. will find out the the Bank of the transaction and will export the credit card details into flat files for each bank separately.
Prerequisites
If you have already exercised any of the below articles from this blog,
You would already have Project SSIS-Tutorials and Credit Card Details Table in your database. You can skip first 2 steps and start with 3rd..
Step 1: Create Credit Card Details Table in SQL Server Database
Run SQL Server Management Studio, connect to database and run below script to create Credit Card Detail Table
Step 2: Run SQL Server Data Tools
If already created in previous tutorial(s), open the existing project SSIS-Tutorials.
Step 3: Add new package to the project. Name the package ConditionalSplit.
Step 4: Add Data Flow Task to Control Flow Tab
Step 5: Add and Configure OLE DB Source
Step 6: Add and Configure Conditional Split
Step 7: Add and Configure Flat File Destination(s)
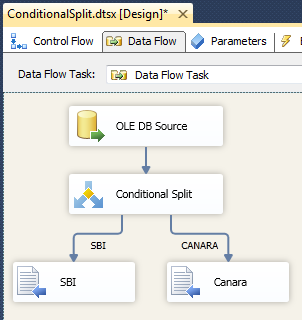
At this stage we are done with creating the package. Package looks like below
Now let's execute the package.
Package execute successfully. You can clearly view in the execution flow, 9 rows imported from the table and conditional split transformation divided the flow of data to 6 and 3 rows on different paths depending on condition.
Now let's browse the path and check the files and data
Conditional Split is used to divide the flow of data to more than one destination depending on the condition(s).
Example
We have a table in SQL Server Database which stores Credit Card Details and we will fetch the data and on the basis of Credit Card No. will find out the the Bank of the transaction and will export the credit card details into flat files for each bank separately.
Prerequisites
- SQL Server with SSIS
- SQL Server Data Tools
- SQL Server Management Studio
If you have already exercised any of the below articles from this blog,
You would already have Project SSIS-Tutorials and Credit Card Details Table in your database. You can skip first 2 steps and start with 3rd..
Step 1: Create Credit Card Details Table in SQL Server Database
Run SQL Server Management Studio, connect to database and run below script to create Credit Card Detail Table
CREATE TABLE [dbo].[CreditCardDetails](
 [CustomerId] [varchar](50) NULL,
 [CreditCardNo] [varchar](50) NULL,
 [TansactionType] [char](2) NULL,
 [TransactionDate] [datetime] NULL,
 [Amount] [numeric](18, 2) NULL
) ON [PRIMARY]
GO
INSERT [dbo].[CreditCardDetails] ([CustomerId], [CreditCardNo], [TansactionType], [TransactionDate], [Amount]) VALUES
('C00000001', 'SBI000000001', 'DR', '01/01/2016', 2500.00),
('C00000002', 'CAN000000001', 'DR', '01/01/2016', 2800.00),
('C00000001', 'SBI000000001', 'CR', '02/01/2016', 25.00),
('C00000003', 'SBI000000002', 'DR', '02/01/2016', 1485.00),
('C00000004', 'SBI000000003', 'DR', '03/01/2016', 2528.45),
('C00000002', 'CAN000000001', 'CR', '04/01/2016', 14.00),
('C00000003', 'SBI000000002', 'CR', '04/01/2016', 37.13),
('C00000004', 'SBI000000004', 'DR', '05/01/2016', 1000.00),
('C00000005', 'CAN000000002', 'DR', '05/01/2016', 3000.20)
Step 2: Run SQL Server Data Tools
If already created in previous tutorial(s), open the existing project SSIS-Tutorials.
Step 3: Add new package to the project. Name the package ConditionalSplit.
Step 4: Add Data Flow Task to Control Flow Tab
- Double Click Data Flow Task to switch to Data Flow Task Tab.
Step 5: Add and Configure OLE DB Source
- Drag and Drop OLE DB Source from SSIS Toolbox to Data Flow Task.
- Double Click OLE DB Source will open OLE DB Source Editor window.
- Select the Shared Data Connection if not selected we created in Step 2.
- Select Table CreditCardDetails.
Step 6: Add and Configure Conditional Split
- Add Conditional Split to Data Flow Task.
- Connect OLE DB Source to Conditional Split.
- Double Click Conditional Split to open Conditional Split Transformation Editor.
- Conditional Split Transformation Editor is divided into 3 sub windows.
- Columns, variables and parameters are used in expression to split the flow of data. Here we are using CreditCard Column in our example
- In-built functions are optionally used in expression like we are using LEFT function in the expression
- Condition(s) that define how to split the flow of data. In our example we have two conditions where using LEFT function on CreditCard column we are identifying different banks and accordingly splitting the flow of data in different path. You can add more conditions to split more data flow.
Step 7: Add and Configure Flat File Destination(s)
- Add two Flat File destinations and name them SBI & Canara Bank respectively.
- Connect Conditional Split to SBI - Flat File Destination. This will open Input Output Selection window. Select SBI in the Output Drop-down-list and click OK
- Double Click SBI - Flat File Destination to open Flat File Destination Editor.
- Click New will open Flat File Format window. Delimited will be selected by default.
- Click OK will close the Flat File Window and will open Flat File Connection Manager Editor window. Click browse to set the Destination Path of the Flat File. Set the File Name as SBI and click Open.
- Click OK to close the Flat File Connection Manager Editor window.
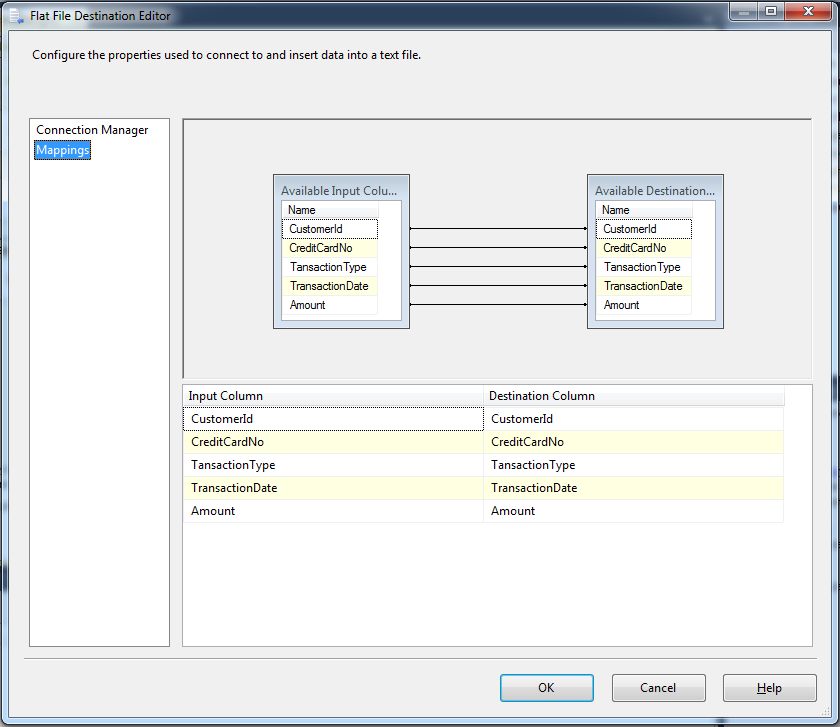
- On Flat File Destination Editor switch to Mapping Tab. Input Column will be auto mapped with Destination Column. In case not, configure mapping like below and click OK
- Repeat the Steps for Canara - Flat File Destination similar to what we have performed for SBI - Flat File Destination. Select Canara as Output and file name
- In Flat File Manager Editor, Flat file Connection Manager will be selected which we created for SBI - Flat File Destination. Click on New to create New Flat File Connection for Canara - Flat File Destination.
At this stage we are done with creating the package. Package looks like below
Now let's execute the package.
Package execute successfully. You can clearly view in the execution flow, 9 rows imported from the table and conditional split transformation divided the flow of data to 6 and 3 rows on different paths depending on condition.
Now let's browse the path and check the files and data


No comments:
Write Comments